jul
29
Category Archives: Digital Voice
jul
28
TYT DMR MD-390 GPS review en watertest
jul
28
DVMEGA on a Raspberry PI using MMDVMhost software
Firmware not detected
Some people have issues with the “firmware not detected” message when run the
DVMEGA on a Raspberry PI uysing MMDVMhost software. I have made an simple
instruction to get your hardware platform run. I have test the instruction below on
Raspberry B+, V2 and V3. This is not an instruction how to install but just to check
your configuration.
Start with burn a new Western D-Star image on your SD card. This image can be
download from next location : http://www.westerndstar.co.uk/Downloads/DStarRepeater+ircDDB+Widget_Pi3.rar
Place you DVMEGA onto the Raspberry PI before you start the image the first time.
Do not load or install other software and do not change settings yet. The Western DStar
image comes with DVMEGA default pre-configured. Check first if the beacon
counter does count up.
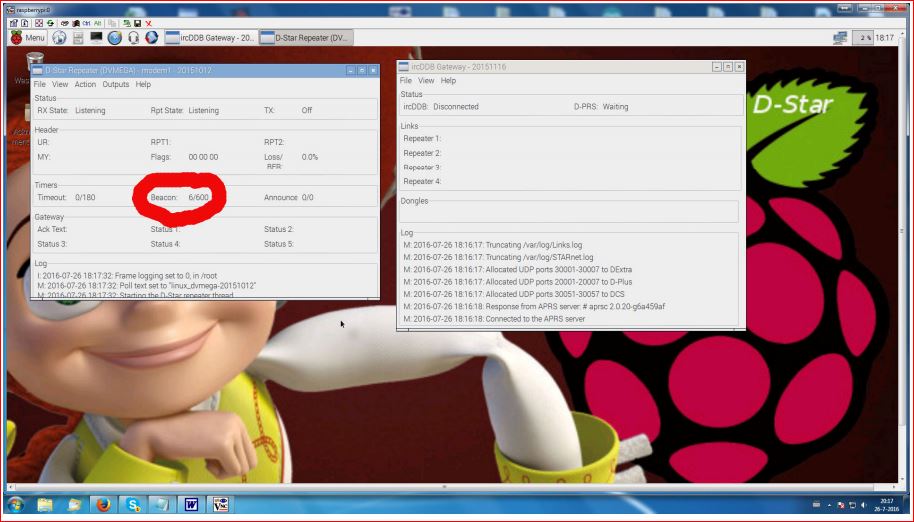
If the beacon counter is counting you know your hardware platform is okay.
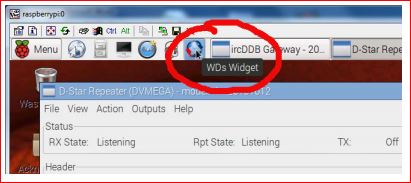
Before you install the MMDVMhost, stop the autostart of the D-Star repeater module.
– Start the Widget
– Set Starup repeater1 to “none”
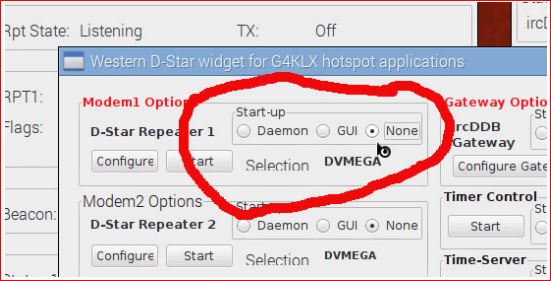
– Press Save

– now power cycle your Raspberry PI. This is a very important step. The DVMEGA
has a auto protocol selector at start up. The DVMEGA is now running in D-Star mode
and has to be power cycled to enable the protocol selector again for MMDVMhost
later on.
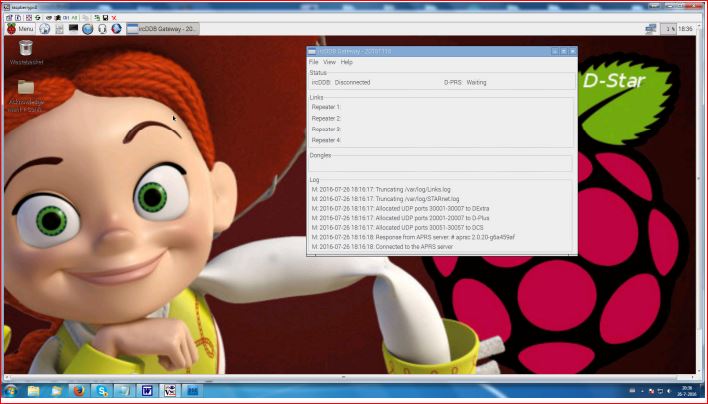
When the Raspberry has restarted, check that only the ircDDB Gateway runs.
You can find more information on the ircDDB Gateway settings, under chapter
“Configuration ircDDB Gateway software” in next document :
http://www.dvmega.auria.nl/images/DVMEGA%20RPI%20Radio%20Manual.pdf
Now we go to prepare the raspberry for MMDVMhost
– Open a terminal window
– Type “sudo apt-get install git” (git tool will be installed now)
– Type “git clone https://github.com/g4klx/MMDVMHost” (directory will be created and
all required files downloaded)
– When download is done go into the new created directory, Type “cd MMDVMHost”
– Your promt will be look like this : pi@raspberrypi:~/MMDVMHost $
– Then enter “make” (to compile the MMDVMHost software)
– When compilation is done you have to set your MMDVM.ini.
Type “sudo nano MMDVM.ini” , a working .ini looks like this :
[General]
Callsign=YOURCALL
Timeout=180
Duplex=0
# ModeHang=10
RFModeHang=10
NetModeHang=3
Display=None
Daemon=0
[Info]
RXFrequency=434999800
TXFrequency=434999800
Power=1
Latitude=0.0
Longitude=0.0
Height=0
Location=JO21AK
Description=DVMEGA
URL=www.google.co.uk
[Log]
# Logging levels, 0=No logging
DisplayLevel=1
FileLevel=1
FilePath=.
FileRoot=MMDVM
[CW Id]
Enable=1
Time=10
[Modem]
Port=/dev/ttyAMA0
#Port=\\.\COM3
TXInvert=1
RXInvert=0
PTTInvert=0
TXDelay=100
DMRDelay=0
RXLevel=50
TXLevel=50
OscOffset=0
Debug=1
[D-Star]
Enable=1
Module=A
SelfOnly=0
[DMR]
Enable=1
Beacons=1
Id=2044012
ColorCode=1
SelfOnly=0
# Prefixes=234,235
LookupFile=DMRIds.dat
CallHang=3
TXHang=4
#Blacklist=
#DstIdBlackListSlot1RF=
#DstIdBlackListSlot2RF=
#DstIdWhiteListSlot1RF=
#DstIdWhiteListSlot2RF=
#DstIdBlackListSlot1NET=
#DstIdBlackListSlot2NET=
#DstIdWhiteListSlot1NET=
#DstIdWhiteListSlot2NET=
[System Fusion]
Enable=0
[D-Star Network]
Enable=1
GatewayAddress=127.0.0.1
GatewayPort=20010
LocalPort=20011
Debug=1
[DMR Network]
Enable=1
#Address=195.225.116.123
Address=brandmeister.pd0zry.ampr.org
#Port=55555
Port=62031
Password=passw0rd
Slot1=1
Slot2=1
Debug=0
[System Fusion Network]
Enable=0
LocalAddress=127.0.0.1
LocalPort=3200
GwyAddress=127.0.0.1
GwyPort=4200
Debug=0
[TFT Serial]
#Port=/dev/ttyAMA0
Brightness=50
[HD44780]
Rows=2
Columns=16
# For basic HD44780 displays (4-bit connection)
# rs, strb, d0, d1, d2, d3
Pins=11,10,0,1,2,3
# Device address for I2C
I2CAddress=0x20
# PWM backlight
PWM=0
PWMPin=21
PWMBright=100
PWMDim=16
DisplayClock=1
UTC=0
[Nextion]
#Port=/dev/ttyAMA0
Brightness=50
DisplayClock=1
UTC=0
IdleBrightness=20
[OLED]
Type=3
Brightness=0
Invert=0
– Exit the editor by press CRTL-X
– Confirm modification by type Y and press enter
– start MMDVMhost, type “./MMDVMHost MMDVM.ini”
jul
22
DVMEGA montage in 1 minuut!
jul
21
SharkRF’s openSPOT beschikbaar
Voor de mensen die reeds op de wachtlijst stonden … het wachten is over, de openSPOT is leverbaar. (zie ook onze eerdere blogs over dit product) De eerste batch zal worden verstuurd als je de bestelling plaatst onder je emailadres waarmee je op de wachtlijst stond. Overigens hebben alle wachtlijsters hierover een email gekregen.
De openSPOT kost €219 en wordt vanuit Estland met DHL Express naar je toe gestuurd voor €19
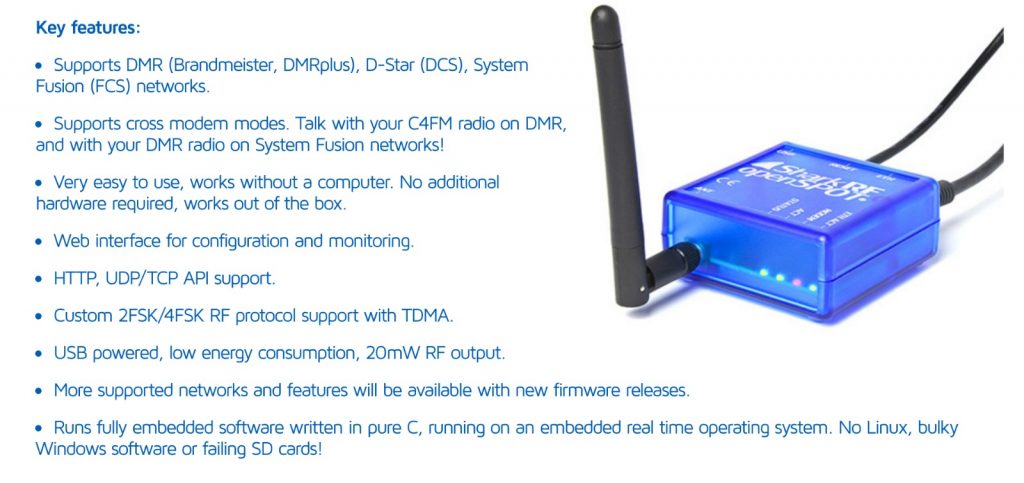
Zoals de naam al doet vermoeden is het een open source product (voorlopig alleen de API, zie Github ) en ondersteund alle actuele DV modes w.o. D-STAR, DMR en Fusion. Het apparaat is een hotspot, waarbij Radio, Modem en Connectie met een DV Netwerk zijn ingebouwd. Je hebt dus geen separate PC, Raspberry Pi of Android nodig om operationeel te zijn. Let wel dat de netwerk verbinding een vaste LAN kabel is en dus geen WiFi.
Er zijn al exemplaren onderweg naar Nederland dus eerdaags zullen de eerste openSPOTters wel te horen zijn. We blijven berichten over de ontwikkelingen.