feb 27

AMP-25 series VHF / UHF Amplifiers

Bron: hamgear.wordpress.com

The  AMP-25  series  VHF / UHF Amplifiers

The recently announced BTech Digital and Analog amplifier series puts a whole new spin on mobile operation. It performs more like a mobile than it does a power amp. The D series are true TDMA Tier2 DMR amplifiers.

Note: This review was done using an Anytone D868UV on both DMR and analog.

In the Box

Included with the 40W Mobile Amp are:
–  Mounting Bracket
–  3′  Interface Control Cable (Kenwood K1 connectors)
–  3′  RF connect cable (SMA-M to SMA-F)
–  Microphone and Hanger
–  All necessary mounting hardware
–  User Guide

General Description
–  UHF or VHF Power Amplifier
–  2-6W  >  20-40W  Output

                         Modes of operation include:

             V25  U25             V25D   U25D
Analog (FM)
C4FM (Fusion)
P25  (Phase 1)
NXDN
IDAS
dPMR
MPT1327
 >  DMR Tier II (TDMA)
 >  P25  (Phase 2)
Analog (FM)
C4FM (Fusion)
P25  (Phase 1)
NXDN
IDAS
dPMR
MPT1327

A Different type of Mobile Amplifier

I found these to be much more than a typical power amplifier. Although they can function as a simple ‘In and Out’ power amp, this is about as close to a full mobile as you can get. Although the driving force was my DMR handheld sitting in my cup holder, the transmit audio was that of the included hand microphone and the receiver audio out was coming through the built in speaker driven by a four watt audio amplifier.
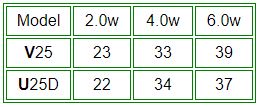
Transmit Power

I tested the power on two different models. The VHF V25 (non TDMA) and the U25D for UHF DMR.  The power was tested using the analog side of both into a calibrated Bird Termaline wattmeter. The maximum current drain from my 13.6V 30A power supply was just under 6A. This is low enough for the amp to be powered by the 10A accessory jack in your vehicle.

Enclosure

The basic frame measures 4.6″W x 1.3″H x 5.5″D (excluding the SO-239) and weighs in at 26oz.  I was 
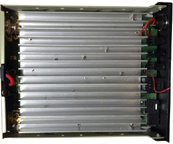
curious to see the internal layout of the amp and to no surprise, there was a 5/8″ finned heat sink spanning the entire length and width of the case along with air vent along the back of the enclosure.

Operating Modes

These are single band amplifiers.
V25(D) = VHF 136-174MHz
U25(D) = UHF 400-480MHz.

Note: The V25D and U25D were designed to include DMR Tier II (TDMA) and P25 Phase 2 along with all other modes. Their operation varies slightly.

V25  /  U25
To operate VHF through the UHF (U25) amplifier, or UHF through the VHF (V25) amplifier, simply power off the amplifier. This will allow you to run straight through directly to the antenna without power amplification on that band.

V25D / U25D
These amplifiers will only operate within their specified VHF or UHF range. This is due to the circuit switching design of DMR Tier II and P25 Phase 2.

Hook Up

The simplest configuration is using the included RF cable to attach the radio to the amp. You could add a Spkr/Micr to the handheld, but you would still be bypassing some of the best features.

I use the two included cables. The 3′ RF cable to attach the radio to the amp, and the control cable. This allows me to use the full size hand microphone as well as connecting the four watt audio amp powering the speaker. The power included power cable is compatible with handhelds using the standard two pin Kenwood style connector, such as an MD380, D868, GD77, UV5R, F8HP, UV82, etc.

I use an Anytone D868 on DMR as well as analog with the hookup diagrammed below. Depending on your radios antenna jack, you may need to pickup an SMA-M to SMA-M adapter.


Convenience

All channel selection and volume adjustments are done using the handheld. No duplicate programming or code plugs are necessary. Whatever is in my handheld is what I operate in the mobile

Operating my handheld in the low power position, I still get 22W out on UHF and my handheld’s battery life remains excellent, but high power gives me a solid 39W.

Conclusion

I was glad to see someone finally develop what is a full featured mobile amplifier capable of  DMR as well as all other modes including C4FM and D-Star that is small enough to mount in the car, boat, and on top of your computer. This amplifier is Part 90 certified and definitely worth considering.

Available from Amazon:    V25     V25D     U25     U25D
and     

VHF /UHF
Digital / Analog
Mobile Power Amplifiers

feb 17

Upgraden van je Yaesu FT2D

Bron: VE7ED.com
ISSUES
– Complete Firmware Updating below
 
Main
Ver. :
2.02
Sub
Ver. :
2.01
DSP
Ver. :
4.30
 
(or you can follow these — > quick steps)


DSP USB driver (step one!)
–>With explanation<–
Symptom:
1. Driver install – Reports “Operation Completley Successful” ( no Comport in Device Manager)
2. Universal Serial Bus Controller shows an error as listed below


NOW WHAT!…..it is all good at this point there is more later!
 
Here is what I did….from the begining
 
1. Download from the yaesu.com website the file shown in the red box below
 
 
2. Unzip the Firmware update file
 
3. Sorted those file files into different folders as seen below.
 
4. Using File Explorer go to the ft2d_com folder you should see 2 files and the one we are going to use it the one in the red box.


5. Right mouse on the FT2D_Com.inf and click on “Install”
 
 
6. You will see the following screens and click on the info in the red boxes


NOTE: Driver Install
Step 1Completed!
 
Step 2 – Will happen after the MAIN and SUB firmware updates are done…Standby!


Firmware update  – Main


Follow the Yaesu instuctions… including the USB Driver install


Firmware update  – Sub


Follow the Yaesu instuctions… including the USB Driver install


DSP USB driver (step two!)
FROM PAGE 11 on…


STOP HERE!!!!


Open Device Manager and you will now see this….
(Yours will not have the red box’s)


Continue with the DSP update….


Finished the updates!
 
Now to check and see.
 
1. Turn on FT2D.
2. Press and hold DISP till the setup menu appears
3. Go to DISPLAY
4. Scroll to 11 SOFTWARE VERSION and choose it.


feb 16

Hoe maak je een MMDVM Digitale Repeater

Bron: sadigitalradio.com


This page assumes you know what a MMDVM (Multi Mode Digital Voice Modem) is, but not how to use it or put it together. Also, that you have had some experience with the Raspberry pi. Click HERE to learn about the MMDVM. This article will be technical. However, if you studied for and passed your ham radio tech license (key word being, studied) this page will be easy to follow and use. Soldering skills will be a plus as well. Soldering and playing with electronics just goes hand in hand.

After following this article you will be able to put together a multimode amateur digital repeater that can be connected to the internet for world wide digital communication. Through proper coordination, given digital’s IP connectivity and features, Ham radio operators around the world can build fully connected systems, allowing remote parts to have access to RF communication. A connected digital environment allows us to leverage MESH networks like Broadband Ham Net or ARDEDN in events where the internet may not be reliable. Think about it, the ham community can build a large network that has the ability to be “offline” and still allow for clear digital voice communication. How cool would that be! If its easy and cheap to build and can be done in areas with no internet, that’s helping humanity. Baby steps though, lets just get this digital node built.

7 Items needed:

  1. Rasperry Pi 3 = Amazon
  2. Micro SD card = Amazon
  3. MMDVM board = ZUM MMDVM* or Micro-Node
    1. *ZUM is handled by one amazing guy, Bruce, and a small support team. Orders are handled directly through emails to Bruce. The devices are ~$100, and take a few weeks to ship. Payments are handled over paypal
  4. 1 or 2 radios with a 9600buad port, or a pre discriminator tap.
    1. A simplex node will use 1 radio
    2. A duplexed node will use 2 radios and will require a duplexer.
    3. Choose a radio carefully keeping in mind duty cycle and heat dissipation, EXTREMELY IMPORTANTA cooling fan will be an absolute must! Motorola radios are great, but have drawbacks if you don’t have access to programming software. The old Icom/kenwood sitting in the corner collecting dust is a viable option. Many people are using the Yaesu DR-1X repeater for duplexed operations.
  5. A cable to connect from your radio(s) to the MMDVM*
    1. This can be one of the most difficult parts to the process. There is no single article or how to for making the cable, this is where your inner geek, and solder hands can come to play. Micronode MMDVM does offer pre-made cables for their device, but they are expensive.
  6. Other items include, A dummy load for testing, a power supply, and an antenna for when you are ready for the air. Please help keep the finite airwaves clear of testing and un-needed traffic, use a dummy load during all your initial tests, and any future tweaks you may need to do.
  7. The Pi-Star Image for the SD card

These 7 items will give you:

  • Ability of up to 4 different digital modes, P25, DMR, D-Star, Yaesu Fusion, with on the fly PTT access. Meaning, just key up your radio and it handles the rest.
  • A web interface that can be accessed from a smart phone or computer to control the node remotely with real-time activity.
  • A “high-powered” hotspot or repeater. Please expect other to use your node, sharing is caring!


The layout will look something similar to this, excluding the Arduino (courtesy of f5uii.net)


Building the MMDVM node:

  1. Burn the image to the SD: Download and burn the Pi-star image to the SD card. On windows I use Etcher. Its the simplest and easiest burning tool I have found to date. If you don’t have windows, or have never burned an image to an SD card before, there are many tutorials online
  2. Plug the MMDVM into the PI: Depending on which MMDVM you go with, plug it into the PI. If you have the ZUM MMDVM, simply plug it into the GPIO pins of the Raspberry PI. (See top picture)
  3. Make the cable: Here’s the hard part, making the cable……
    1.  
    2. Essentially, you will need to look in the manual of your radio for its pinout. The table below is for connecting Motorola CDM Radios to the MMDVM
    3. MOTO TX –PIN 3 PTT MMDVM — PIN 7 BLUE PTT
      MOTO TX — PIN 5 FLAT AUDIO IN MMDVM — PIN 6 GREEN TX AUDIO
      MOTO TX — PIN 7 GROUND MMDVM — PIN 4&5 ORANGE/YELLOW GROUND
      MOTO RX — PIN 11 FLAT AUDIO OUT MMDVM — PIN 3
      WHITE RX AUDIO
      MOTO RX — PIN 8 COR/COS MMDVM — PIN 2 RED COS
      MOTO RX — PIN 7
      GROUND
      MMDVM — PIN 4&5 ORANGE/YELLOW GROUND
    4. You will end up with something like this….
    5. The DB25 connector was used in this case because I can unplug the MMDVM and plug in the DMK URIx for analog all-star. You can choose to wire directly without a connector or use a DB9 for example. The choice is yours.
  4. Program the radio: Pick a frequency and program your radio(s). Not sure what frequency to use? Here is the Texas Band plan. Just make sure you don’t over step any local repeaters or national calling frequencies. In other words, please use common sense. As part of programming your radio, if you are using CDM/commercial radios, make sure all your settings are set to FLAT AUDIO. Here are some resources that helped me program my CDM radios…
    1. digiham boards
    2. Pages 7-12 on this PDF
  5. Boot the PI up: Now that you have the cable made, radios programmed, and the Pi-star image burned to the SD card, put the SD card in the PI and boot it up with a network cable plugged into your local network. Leave the radio(s) unplugged from the MMDVM for now. We dont want to accidentally key the radio with no antenna or burn anything up with bad SWR etc…
  6. Navigate to the dashboard: If your PI is booted and has network connectivity all you need to do is open a web browser on a computer or your phone and go to…
    1. http://pi-star/admin/
    2. Default credentials– Username: pi-star Password: raspberry
  7. Setup Pi-star: This video by W1MSG is an excellent video that goes over the initial setup of pi-star.
    1. Basically the video walks through filling out the required fields, enabling modes you want and configuring those modes. Pi-Star is an amazing, super easy, straight forward tool. Even if you have never used it before, once you are logged in, its easy to get around the interface.
  8. Key up and test it: Once pi-star is configured, go to the dashboard and plug your radio(s) into the MMDVM, making sure you have a dummy load or an antenna plugged in. Key up on the frequency you chose on the digital mode you chose. You should see on the dashboard in Green “RF” and the red PTT light on your MMDVM light up.
    1. One snag I ran into was by default TXINVERT was set to on or ‘1’. I was hearing digital noise, but nothing was decoding it. I fixed it by going into expert mode in pi-star (pi-star.local/admin/expert) and setting it to off or ‘0’ under MMDVMHost. TXINVERT and RXINVERT depends on the radio you use. This may require trial and error.
  9. Adjust the pots: If everything seems to work at this point, the next step is to tune the mmdvm’s adjustable audio pots. This is a very tedious process and requires A LOT OF PATIENCE. Most of the time, the pots are already set from the factory and usually don’t need adjusting. But if you are seeing constantly high BER or not getting audio back, you will need to adjust the pots. There are 3 ways you can tune the pots to achieve desirable BER/Audio. DMR is the most picky and requires even more patience.
    1. Using an expensive Oscilloscope 
    2. Using an SDR
    3. Slowly making adjustments while keying MMDVM
  10. Open firewall ports: Now to open ports on your firewall. This will be required in order to take advantage of internet linking. I will just cover the ports that are required to be open, not how to do it. If you have opened ports for WIRES-X, this is no different.
    1. UDP 62031 — Homebrew repeater protocol
    2. UDP/TCP 20001-20009 — DPLUS
    3. UDP 30001 — D-EXTRA
    4. UDP 30051,30062 — DCS client
    5. UDP 40000 — D-Star call routing
    6. TCP 9007 — IRCDDB
    7. UDP 20011-20014 — Dstar repeater
    8. For more information: Brandmeister page & Dstar101

Here is the N5AMD Repeater. The radios were in a trash pile destine to be destroyed. In a digital world, analog radios are being thrown to the side for many commercial 2-way companies. They have been revived and now serve the community helping hams learn about the world of digital radio.  From top to bottom…

  • MMDVM/ Raspberry Pi 3
  • Motorola CDM1550LS+ 2x
  • 15amp Power supply
  • Celwave UHF Mobile duplexer
  • Motorola GR300 case slightly modified to fit the CDM1550s

last edited: 12-28-2017